Monday, April 29, 2013

C2E2 2013!

Convention season has begun! The Chicago Comics and Entertainment Expo, more commonly known as C2E2, was this weekend at McCormick Place. Jason went all three days; I was unable to get Friday off, so I went on Saturday and Sunday.

There was a lot more room devoted to the convention this year than in previous years, which made everything seem less crowded. I noticed a huge difference on Saturday--even with all of the crowds, I was still able to navigate pretty easily.

My brother and I went to a panel on Saturday. One of our favorite YouTubers debuted two new videos. If you are a fan of comic book movies, you should definitely check out ItsJustSomeRandomGuy. He makes videos with action figures, and they are HILARIOUS. He started out doing parodies of the Mac/PC ads, but he also does movie trailer parodies, song parodies, and a series of original stories with its own continuity (boom). The main event at the panel was the final episode in his "Zero Hour" series, which ended up being a rough cut without special effects. It's not online yet. RandomGuy opened the panel with this song parody, and he sang Superman's part live.


The "panel" was actually on a stage near the concessions, rather than in a room with rows of chairs. Johnny and I sat at a table with a bunch of strangers and started talking about our various interests as we were waiting. One of the things I love about conventions is how easy it is to find things in common with people.

I did all of my shopping on Saturday. I bought two t-shirts (Pinky and the Brain and Care Bears), some buttons for my convention backpack, and a "Live Long and Prosper" necklace. My favorite find was a booth selling vintage Care Bears (yes, I'm kind of Care Bear crazy). They were 20 bucks each, so I only bought one.

Sunday's highlight was meeting Felicia Day! She signed my "Doctor Horrible" DVD, and she was super nice.


I saw some great costumes both days. 
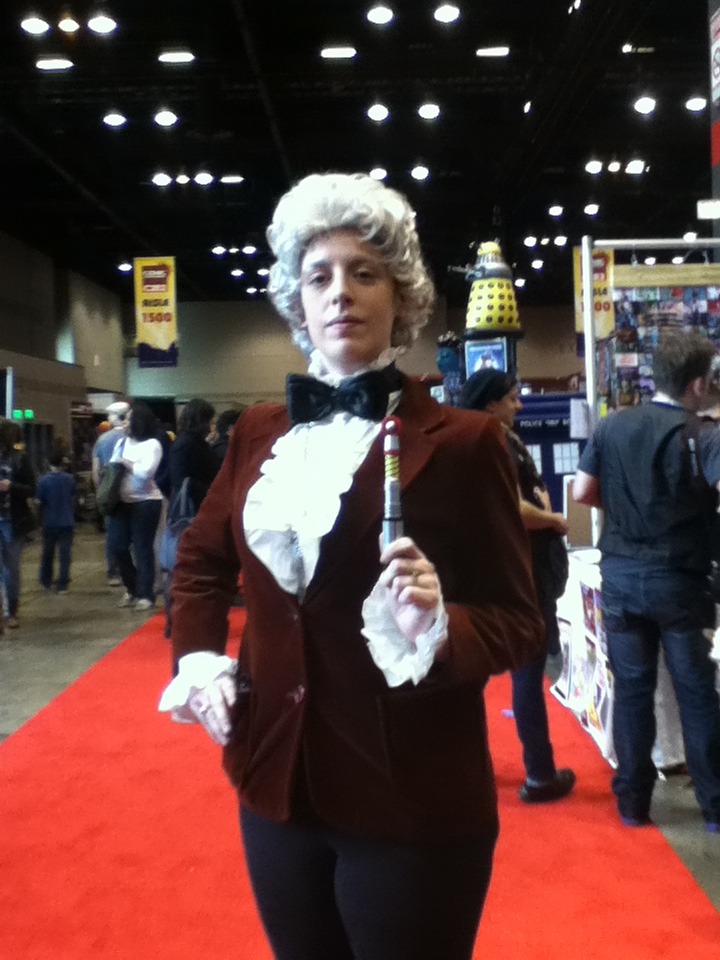

Jason spotted this female Third Doctor on Friday, and then we ran into her again on Sunday right as we were leaving.

Doctor Horrible was popular this year:


I saw a lot of families with kids on Sunday. It seemed to be the best day to bring them, because the crowds were smaller. I had never been to a convention on Sunday before. It was interesting to compare the crowd levels. 

Anyway, this girl had a great costume:


Whatever you do, DON'T BLINK.

And finally, someone at the convention on Saturday had the best car EVER.


It's a Volkswagen Ladybug! How cool is that?

That's it for my convention wrap-up. Hat-a-week should be returning shortly. I am close to finishing my sweater, and I already have my next hat commission. Jason has requested a Metroid hat, which my brother heartily seconded. For those of you unfamiliar with the monsters, this is a Metroid: 
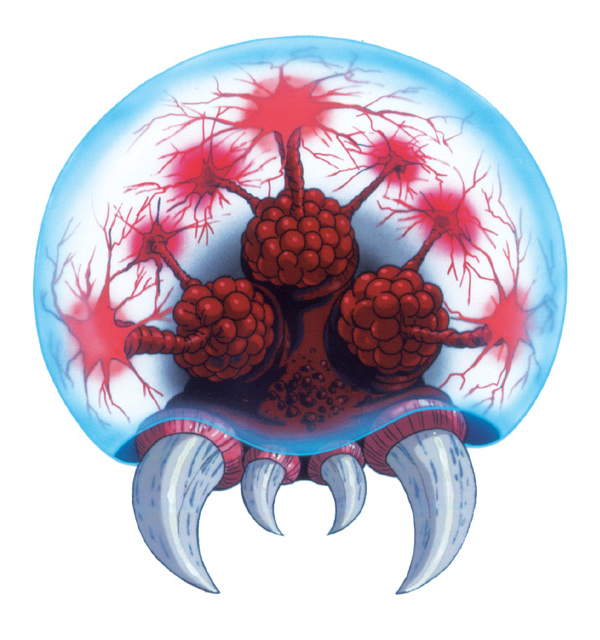
I'm not entirely sure how well this will translate to hat form, but we shall see!

Saturday, March 23, 2013

Business Idea!

Even though we had the first day of spring a few days ago, and it still feels like winter, I must be ready for summer. I had a very pleasant dream last night about going to the beach.

When I woke up, I started thinking about swimsuits. I don't think I need to buy any, because the ones I bought last summer should still fit, but they're fun to buy (or even just look at). My idea last year was to buy separates so I could mix-and-match. I have two tops with different designs and two bottoms that match either top, so it's really like I have four swimsuits. I could even buy another top that matches either bottom and get two suits for the price of one item!

But there doesn't seem to be any line of swimsuits really designed around this mix-and-match idea. So this morning I came up with this brilliant business plan, which is sadly far beyond my abilities to do myself. If anyone reading this wants to steal my idea, please do. You don't have to credit me or anything (maybe offer some stock options so I can cash in when your company makes a billion dollars).

So this company would make swimsuits designed to be mixed and matched. The tops would all be patterned and the bottoms would all be solid, just for simplicity's sake. You could start out with three colors (say black, white, and red) for the bottom. The tops could have any kind of pattern that uses those colors. Stripes, polka dots, flowers, checks...anything, really.

But what would make this different from the other suits on the market is that all of the bottoms would have belt loops, and all of the tops would come with a strip of matching fabric to wear as a belt. This would tie everything together and make it look like that set was designed to be worn together. But then you can change the top and change the belt, and have another perfectly matched suit. It even encourages people to buy everything from your company (instead of also mixing and matching whatever's cheapest).

If you wanted to take the customizing idea even further, you could have the bottoms come with a solid color bow or something to attach to the top. That way you could have designs with only two of the colors, like zebra stripes, that can still be worn with any bottom.

The company could have as many or as few options as you like. In addition to fabrics, you could offer different styles for the tops and the bottoms. Or just keep it simple. I would do this myself, but unfortunately I don't have the sewing skills to even attempt making my own suit. So somebody make this business happen.

Any top + Any bottom = Swimsuit. Who's with me, ladies? I would buy one of everything.

Thursday, March 7, 2013

Hat #8 (Hat-a-week): Jayne Hat

Man walks down the street in this hat, you know he's not afraid of anything...


This hat is a great way to find other fans of Joss Whedon's Firefly. Fellow browncoats will immediately recognize this as the hat that big, tough guy Jayne Cobb proudly wears after receiving it in a package from his mother.

When I was sorting through my stash of yarn, I set aside the red, yellow, and orange, which was left over from the Jayne hat I made a few years ago. All three colors are Lion Brand Vanna's Choice, so the yarn can be found at any craft store. I used my standard hat pattern for the orange and yellow sections, with an inch of ribbing at the bottom. It should be noted that hats with earflaps usually don't have ribbing--the part that makes the hat stretchy--but it's visible on the original so I included it here. I used the orange until it was about 4 inches and then switched to yellow. When I finished off the main hat, the next step was the earflaps. For the first one, I turned the hat upside-down and picked up 20 stitches. I worked back and forth in stockinette stitch until they were about 3.5 inches. I decreased by knitting 2 stitches together across the right-side row twice (leaving me with 10 stitches, and then 5). On the next right-side row, I decreased 2 more stitches and cast off the final 3. Then I repeated on the other side.

The final step was the giant pom-pom on top. I have a set of pom-pom makers, in 3 different sizes, so naturally I grabbed the biggest one. I used all three yarns together, and when I was done I used the yarn end from the top of the hat to sew it in place.


Pretty cunning, don'tcha think?

My current knitting project is actually not a hat--it's this sweater from a book called Vampire Knits

Photo from Ravelry
Mine is going to be denim blue. I'm working on the lace portion at the bottom now. I will be taking a break from Hat-a-week while I finish the sweater, because I really only have time right now to work on one knitting project at a time. I'll try to post some progress shots on the sweater, though!

Saturday, February 16, 2013

My iPod is bigger on the inside

A couple weeks ago I decorated an iPod case for my brother as a birthday present, and mentioned that I had an idea for another custom case. I had some time off this week and was finally able to get it done. Introducing...the TARDIS iPod!


Sorry for the flash..I'm used to using the iPod camera to take pictures for the blog, but I had to dig out my old digital camera to get a picture of the pod inside the case. Here's the best part:


Matching background screen!

And a shot of the back (before I assembled the case):


Here's how I did it. The first step was drawing the outlines and the words. I printed out a picture of the TARDIS the same size as the case and taped the case right on top. Actually, it was the same width but taller. That's why the bottom panels cut off in the middle. I also flipped the picture to create a mirror image before I printed it out, because I did all the painting on the inside of the case. This keeps it from rubbing off after use. I used the same paint markers that I had for Johnny's case: black for the outlines and a thin white marker for the words.


On the front, I lined it up so the hole in the center covers up "Public Call" and the on the side covers up the "O" in BOX. On the back, I lined it up so the hole for the camera covers up the first 3 letters. Now it says "ICE BOX" which I find amusing. Rather than try to trace over the letters in "Public Call" I just made small lines. The white you see in the windows and on the sign is actually on the picture I taped the case onto. A more confident artist could probably freehand the whole thing, but I like tracing. The markers are very easy to use and the lines are nice and even.

In my first attempt on the front, I colored over the words with the black marker. Either the words needed another coat or the paint wasn't fully dry, because the words were barely legible afterwards. I had to muddle over the problem for a bit until a solution came to me: if the paint markers are acrylic, and nail polish is also acrylic, will nail polish remover work to take off the paint? Answer: yes, it will. Rather than risk smearing the paint a second time, I drew lines above and below the words and left the space around them blank.

To make the sign, I cut out the sign from the picture I had printed (not mirror-image, so I had to re-print it) and pasted it in. I used a mixture of Elmer's glue and water. The only problem is that the printer ink is water-soluble, so the edges of the sign are now illegible. I was kind of going for a stained-glass feel, so it kind of works. That particular bit just looks more aged than the rest.

To fill in the background, I used tissue paper. I could have used solid blue, but all I had was plain white. However, I also have a set of 50 colored pencils! I colored in a block of blue using a few different shades mixed together. First I cut out small squares of white to fill in the windows, and a thin strip of black for the top:


I ended up doing three layers of white squares. The background covers the entire case, so there's blue behind the white. I didn't bother cutting around the windows; three layers gives enough opacity that you can't tell that there's anything behind it. Likewise, two layers of blue was enough to create the effect I wanted. 


For the front, I did thin strips to cover each side, again with a layer of black over the words before the two layers of blue.


I let everything dry overnight, then went back and trimmed away the extra paper with an X-acto knife. Don't try any trimming while the glue is wet--the paper is so thin it will almost certainly tear. I even had a couple rips while I was applying the paper, although that can easily be repaired by gluing a small piece on top to cover the hole. After the trimming was done, I put another glue-and-water coat around the edges and corners so they wouldn't pull away.


The first time I tried putting the two halves together, the bottom corners wouldn't fit, so I had to go back and trim a liiiiitle bit more paper from each side. The only problem with this particular case is that the tabs lock so securely I'm always afraid something is going to snap when I take them apart again. Now that everything is done it's going to stay together for a long while.

The finishing touch was my background picture. I traced over the windows and door panels onto another piece of tissue paper, colored it in, and scanned it into my computer. From there, I played around with it a bit in MS Paint (yes, I'm old-school like that) to darken the colors and add in the "Pull to open" sign. Then I transferred it to my iPod and set it as the background screen!

Wednesday, February 13, 2013

Hat #7 (Hat-a-week): Epbot!

Here is my latest hat creation! Fellow readers of EPBOT will recognize this little guy instantly. Everyone else will think it's just a robot hat, but still pretty adorable.


Epbot is one of my favorite blogs. I started reading her other, more famous blog, Cake Wrecks, after I found the CW book and could not stop laughing. I think my favorite was the cake which said, in beautiful script, "Go Die In a Car Fire." Anyway, Jen has the most amazing projects on her blog. One of my goals in life is to make a penny desk...though that will undoubtedly need to wait until Jason and I have a house, rather than an apartment with carpeting that could get covered in bartop epoxy. Jen is one of my favorite friends-I've-never-met. I think that should be a thing now: someone you feel like you know, through blogs or YouTube videos or podcasts, but you've never met in person.

But I digress. Back to the hat! I find that designing a piece from scratch (rather than adding a picture to an otherwise plain hat) is easier with crochet than knitting. This is probably because it's easier to see my work as I go along--with knitting, all of the stitches are connected to the needle until it's all done.

Unlike knitting, which starts at the bottom, crocheted hats usually start at the top. I started with the plain silver yarn to make the basic hat. The embroidery was next: teal for the eyes (the same fuzzy stuff I used for the brim of my last hat) in satin stitch, and backstitch in black to make the seams. 

The little earpiece-thingies (I think?) on either side were made separately and sewn on. The little knobbly parts I worked with a smaller size crochet hook. Then I picked up 4 stitches with a knitting needle and worked a couple inches of I-cord. The antenna/orange light on top is made from pipe cleaners. I twisted the orange one around a yarn needle to get the right shape. I used the very end to make a little loop and put the end of the black pipe cleaner into it. Then I pulled the orange end down through the middle. It seems to be pretty secure. I stuck the other end of the black through the top of the hat and used the yarn ends to stitch it in place.

I had to work the ear flaps in black because I ran out of the silver, which was left over from the Dalek plush I knitted a couple years ago for my hubby. It's called Vanna's Glamour, and I used two strands held together throughout the whole project. The black is worsted-weight yarn.

If people want a more complete pattern I will try and post one later!

The ears tend to flop when I put the hat on. I may try to put some pipe cleaners in there as well, for stability. On the other hand, they do look kinda cute all floppy.


My next hat is going to be another hat with ear flaps, and another hat that sci-fi geeks will probably recognize instantly. Stay tuned!

Well, what do you think, sirs?

It stinks!

Sunday, February 10, 2013

Valentine's Day Ice Cream Cake

In addition to knitting and crochet, the hobbies I spend the most time on, I also enjoy baking. My project yesterday was trying out my new heart-shaped filling pans to make an ice cream cake. The pan is from Wilton, and I found it over on ThinkGeek:

See the indent in the middle of each pan? The pan on the left creates the bottom of the heart, and the one on the right creates the top. I used Pillsbury chocolate cake mix and Joe and Ross (local brand) chocolate chip ice cream. The first step was to make the batter. It came out kind of thick, so I had to spread it out with a spatula to make sure it got into the bottom of the pan all around and covered up the raised parts in the middle.


The next step was to bake the cakes. The recipe book that came with the pan set said the most of the cakes should bake for 25-30 minutes. However, their chocolate cake recipe had a baking time of 38-42 minutes. I was unsure if this was a typo or if chocolate cakes took longer to bake. I decided to start with 30 minutes, and that seemed about right. While the cakes were baking, I moved the ice cream and the Cool Whip (for the icing) from the freezer to the fridge. 

The floor in our kitchen is slanted slightly, enough that it actually can affect cakes and things while they are baking. I once had a pan of brownies where one corner was thin enough to break like peanut brittle, and the opposite corner was very thick. I tried to correct this problem by turning the pans around halfway through, but I must have waited too long because they had already started to rise unevenly. 


The one on the right (the top half) had me especially worried, because it looked like there was a small hole in the cake. They looked pretty good once I turned them out of the pan, though.


There was no sticking, because I made sure to use plenty of spray in the pans. I may have even used a little too much. But to get the cakes out, all I needed to do was turn the pans upside-down and tap on them a few times. The next step was the filling. I used a regular spoon to fill the cavities with the ice cream, which had softened very nicely in the hour or so it took to bake and cool the cakes.


It looks like an owl face, doesn't it? The "beak" in the middle is a dollop of ice cream that accidentally dripped onto the rack and melted onto the table:


Anyway, after freezing the cakes for about half an hour to let the ice cream set, it was time to flip the top over onto the bottom and frost the whole thing with Cool Whip. The flipping was the step that had me most worried. Fortunately, it went off without a hitch.


I started frosting by putting a big scoop of Cool Whip in the crevice on top. Cool Whip is much easier to work with than, say, buttercream icing. The cake is sitting on a rotating stand, which I bought when I took Wilton cake classes a couple years ago. It made it very easy to frost it all the way around. I smoothed the Cool Whip with the spatula as best I could.


Not quite ready for the cover of Martha Stewart Living, but not bad either. The cake stand has a tab that can be pulled to lock it in place, so I locked it, covered it with foil, and stuck the whole thing in the freezer.

The only question left is, how did the heart-shaped filling come out? Check back later this week! We are saving the cake for Valentine's Day.


Tuesday, February 5, 2013

Birthday Gifts

My brother's birthday is coming up this week, so Jason and I went to my family's house to celebrate on Sunday. Johnny was very excited to see the Mario hat. He immediately put it on and requested I take a picture of him wearing it.


I had several gifts for him, including another craft project. I had been wanting for a while to decorate an iPod case, ever since I saw Epbot's tutorial on custom iPhone covers with scrapbooking paper. I snagged a couple of clear cases off of Amazon on the cheap, and my idea was to paint a design on the inside (so it wouldn't rub off). Jason and I went to Hobby Lobby a couple weeks ago to look for paint. I wasn't sure what type of paint would be the best, so I finally ended up with a set of paint markers that are supposed to work on nearly any surface. 

I went with a simple design for my first attempt: the little star guy from Mario. I printed out a picture to use as my template and taped it right underneath the case. I did the black first to outline the star and draw the eyes. Since your design will be seen from the back, the background color needs to be done last. After the black was dry I filled in the middle with yellow. I probably could have waited a little longer, because the black started to bleed through just a little. You'd have to look pretty close to notice, though. Here is the completed case!


I took this one at home before I wrapped it. That's not an actual iPod in there, just the cardboard insert that came with the case (hence the shadow in the picture).

I have another case for my own iPod, but I have a different idea in mind for that one. Stay tuned!